
All NetConnect programs utilise the excellent MUI bubble help feature. If you hold your mouse pointer stationary over certain gadgets, after a few moments a speech bubble will present a short statement of the function of that gadget.
| IMAGE: Bubble Help in Action | IMAGE: Controlling Bubble Help |
|---|---|
 |  |
You can control the use of the bubble help within MUI prefs. Within MUI prefs goto the "System" option and then alter the sliders to suit your needs. You can switch off the bubble help by moving both sliders to the left so they are set to zero.
Many MUI applications use more than 8 colours (which is the normal number of colours used by most Amiga users for their Workbench) which are completely user definable.
A good example of a program that can define pen colours is Microdot-II. This program allows you to set multiple colours for different scenarios. But how do you change the colours when you are using a Workbench running within only 8 colours?

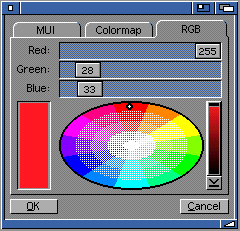
If you goto the RGB colour folder you can select the exact colour you want for each of the colour definables within Microdot-II.
Do this for every colour you want to edit.
When you next launch Microdot-II you will now have your colours as you defined within the MUI preferences. Beware that if you run other MUI applications (that use other pen colours) you may find that some of your colours change appearance. This is due to the lack of colours within Workbench.
You can do two things to get around the lack of pen colours within Workbench. Either use Workbench in 64 or 128 colours (but this will be very slow!) or buy yourself a graphics card which will allow you to run Workbench in 256 colours or even 16/24 bit!
MUI works in two ways:
The full version of MUI allows you to set general preferences for all your MUI programs. You just need to set your preferences the save them using the SAVE button on the main GUI.
MUI also comes with a number of preset preferences such as "XEN" and "STUNTZI" which you can load with the Project Menu and, if you have the full version of MUI, can save/use them as your default preferences.
As with most preferences you have the normal Save, Use and Cancel options. Additionally you'll find a Test button which can be considered to be the most useful function in the preferences program. It will be handy in the beginning to use the `Test' options to play around with the different settings until you have found the configuration that best fits your needs. Pushing the `Test' button makes all currently running applications adopt their parameters from the new values. Thus making it possible to change the settings of a running application and immediately notice the consequences of your actions.
The Use button saves the changes to the ENV: drawer and then ends the preferences program. Please note that the `ENV:' directory usually resides in the `RAM DISK:' and a reset discards all the settings made.
If you want your settings to be permanent, please use the Save button. In addition to global and application specific settings, all window positions will be saved.
If you hit Cancel, all changes will be discarded. Applications that have already adjusted themselves to the new values because you hit Test automatically return to their previous settings.
The full version of MUI allows you to control/edit preferences for every MUI program you use. ie. change the screenmode, the background colours etc etc.
Just load your MUI program as normal and click on the MUI Gadget (see the question below about the MUI window gadgets for more information) and the MUI preferences window will appear. You can also launch MUI prefs from the menu of the program you are using.
You can now change any of the settings and, when you press SAVE, USE, TEST or CANCEL (as descibed above) the new settings will affect the current MUI program you are using.
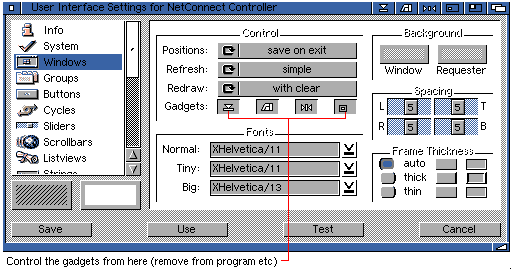
These are the gadgets which are normally found on most MUI windows:

You can control these gadgets by loading the MUI preferences from your program then by changing the settings within the window section:

If these gadget buttons are depressed they appear within your MUI application. If they are not then, obviously, they do not appear.
Most people (beginners and novice users) run their Workbench "as default". This means they are most likely running in 4 colours.
The nice WB designs you seen in magazines or on other peoples computers are made up from a program called MagicWB (although many users also prefer a program called NewIcons) which offers you a range of 8-colour icons for your Workbench.
You need to run Workbench in more than 8 colours to use MagicWB or NewIcons.
There are even CD's containing 100's of icons, backdrops, brushes which you can use to customise your Workbench - or just refer to The Magic WB Drawer within Aminet.
This is easy. Load your MUI preferences (as described earlier) and goto the Listtree option with the prefs list. Just select Windows95 where it asks for Style and your MUI program/s will use the Windows95 style of listtree!
Quite simply, yes! Programs like Microdot-II come with a special MUI module that controls the text editor. AmTerm comes with another module which controls the terminal interface.
These modules are configurable within the MUI preferences. Load the MUI prefs (as described above) and look within the MUI prefs list - within there will be "modules" such as TextView and Term.
You can edit the preferences for these modules in the same way as other MUI prefs, then press SAVE or USE to use the preferences. Remember you can save the preferences for each MUI application or generally for all MUI programs.
Many reasons which directly and indirectly affect MUI. Some main reasons are:
 Only MUI makes NetConnect possible...
Go to the previous, next, chapter, table of contents.